XinFin Remix: Develop Smart Contracts for the XinFin Blockchain
XinFin Remix is a web browser-based integrated development environment that allows the user to write Solidity smart contracts, then Compile, Deploy & run the smart contract on XinFin Blockchain Network.
What is XinFin Remix ?
XinFin Remix is a web browser-based IDE (Integrated development environment) that allows user to write Solidity smart contracts, then Compile, Deploy & run the smart contract on XinFin Blockchain Network
New and upgrade Structure for the XinFin Remix
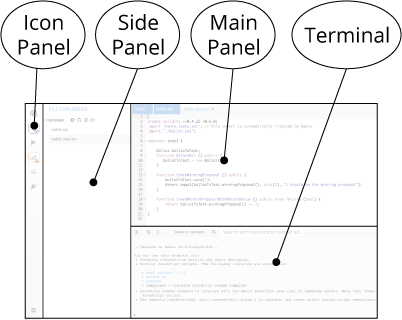
- Icon Panel - click to change which plugin appears in the Side Panel
- Side Panel - Most but not all plugins will have their GUI here.
- Main Panel - In the old layout, this was just for editing files. In the tabs can be plugins or files for the IDE to compile.
- Terminal - where you will see the results of your interactions with the GUI’s. Also, you can run scripts here.
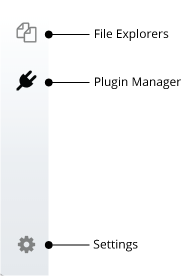
Icon Panel at Page Load
When you load Remix, the ‘Icon’ panel shows these icons by default.
In the upgraded version, everything in Remix is a plugin, making the Plugin Manager highly crucial. On the contrary, each basic task was separated into the tabs in the old layout of Remix. These tabs are now redesigned as plugins.
The number of plugins you’re using at a single time might affect the page loading and make it slightly tedious due to the power required to activate the plugins.
Homepage
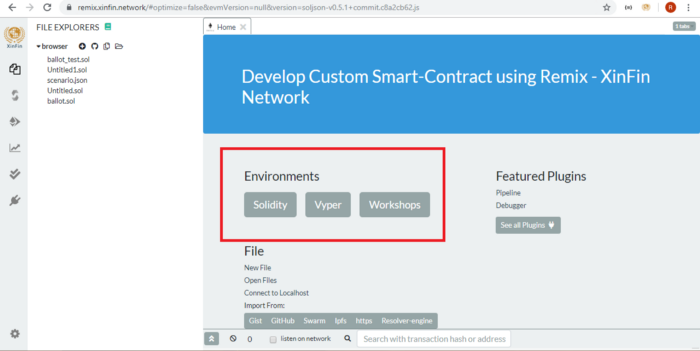
The homepage is located on the top left corner of the tab in the Main Panel.
Clicking on the Remix logo at the top of the Icon panel also opens the Homepage.
Environments
You can click on one of the environment buttons to load a collection of plugins.
In our new version, we have a Solidity Button and a Vyper button, but you will be able to save your own environment in the near future.
To see all the plugins, go to the plugin manager by selecting the Plugin icon in the Icon panel.
The Environment buttons are time & sanity savers so you don’t need to access the plugin manager to get started every time you load the page.
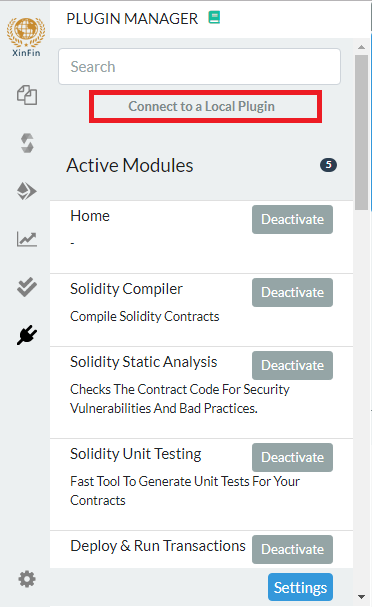
Plugin Manager
We wanted to make Remix flexible for integrating changes into its functionality and for integrating Remix into other projects such as yours. So we transformed everything into a plugin. With this, you only require to load the functionality you need. To let you easily manage and turn your plugins on and off as per your need, we have the Plugin Manager.
You can also create your own plugin and load your local plugin into Remix using the Plugin Manager. You can do so by clicking the “Connect to a Local Plugin” link at the top of the Plugin Manager panel.
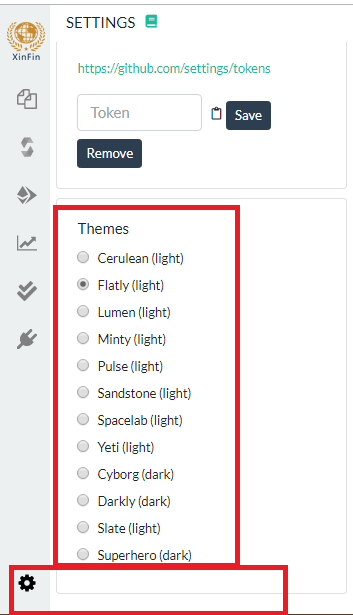
Themes
To make working on Remix fun and more friendly, we added the themes section. You can now work with a dark theme or a grey theme or just any custom theme that best fits your needs.
To choose a theme, go to the settings tab and you can find several bootstrap-based themes towards the bottom of the page.

File Explorer
To go to the file explorer, click the ‘File Explorer’ icon.
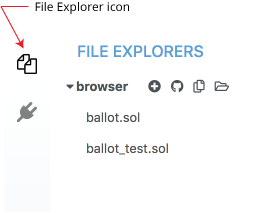
The file explorer by default lists all the files stored in your browser. You can see them in the browser folder and rename, remove or add new files to the file explorer.
Note: Clearing the browser storage will permanently delete all the solidity files you wrote. To avoid this, you can use Remix, which enables you to store and sync files in the browser with your local computer.

Create a New File
You can use the ‘create new file’ option to create a new untitled.sol file in Remix.
Add Local File
If you want to import a local file to the Remix browser storage, you can do so with the ‘add local file’ option.
Publish to Gist
You can publish all files from the browser folder to a gist using this feature.
It must be noted that Gist API has changed in 2018 and it now requires users to be authenticated before they can publish a gist.
Click this link to Github tokens setup and select Generate new token. Check only the ‘Create Gists’ checkbox and generate a new token.
Then paste it in Remix (right panel/Settings tab) and click Save. Now you will be able to use the feature.
Copy to another Remix instance
This feature enables you to copy files from the browser storage to another instance (URL) of Remix.
Connect your filesystem to Remix
You can use this to sync between Remix and your local file system.
Plugin Manager
Everything is a PLUGIN in Remix
To make it easier to integrate new tools made by us and by you into Remix, we’ve now made everything a plugin.
This architecture allows Remix or any part of Remix to be integrated into other projects in a simpler way.
With the advent of Plugins, you will only have to load the functionality you need. It also gives you the benefit of turning off and on plugins as per your need.
You can manage all your plugins in the Pugin Manager, which is also the section of Remix where you can create your own plugin or load your local plugin into Remix.
To do the latter, you can click on the “Connect to a Local Plugin” link at the top of the Plugin Manager panel.
To learn more about how to create your own plugin, go to the README of Remix-plugin repo.
Settings
You can access Settings by clicking the gear icon at the bottom of the icon panel.
You can find a link to the homepage (if you closed it) as well as a link to our Gitter Channel. We also have a rather large list of themes for all you aesthetes out there.
Another important setting:
-
Text wrap: Use this to control how the text in the editor should be wrapped.
-
Enable optimization: This defines if the compiler should enable optimization during compilation. You can enable this option to save execution gas. It is useful to enable optimization for contracts ready to be deployed in production but could lead to some inconsistencies when debugging such a contract.
Solidity Editor
The Remix editor recompiles the code whenever the current file is changed or another file is selected. It also provides syntax highlighting mapped to solidity keywords.
Here’s the list of some important features:
-
It displays opened files as tabs.
-
Compilation Warning and Error are displayed in the gutter.
-
Remix automatically saves the current file every five seconds.
-
+/- on the top left corner can be used to alter the font size of the editor.
Terminal
Primary features available in the terminal:
-
It integrates a JavaScript interpreter and the web3 object. It enables the execution of the JavaScript script which interacts with the current context. (note that web3 is only available if the web provider or injected provider mode is selected).
-
It displays important actions made while interacting with the Remix IDE (i.e. sending a new transaction).
-
It displays transactions that are mined in the current context. You can choose to display all transactions or only transactions that refer to the contracts Remix knows (e.g transaction created from the Remix IDE).
-
It allows searching for the data and clearing the logs from the terminal.
-
It allows you to run scripts by inputting them at the bottom after the >.
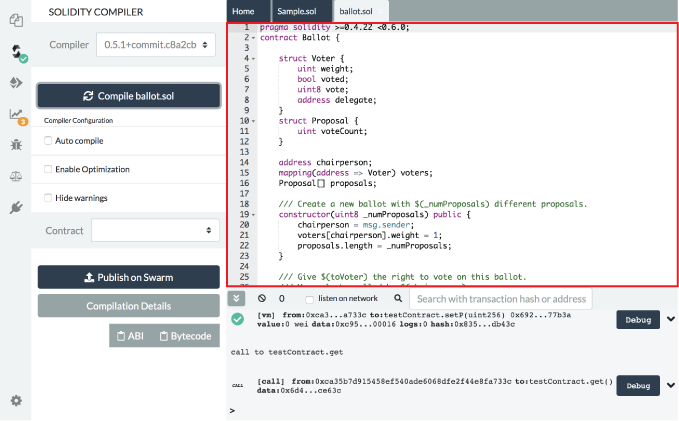
Compiler (Solidity)
Clicking the Solidity icon in the Icon panel will take you to the Solidity Compiler.
By default, you need to click the compile button to trigger compilation(D. in the image below). You can check the auto compile checkbox in case you want the file to be compiled each time the file is saved or when another file is selected (E. in the image below).
Since the release of Solidity version 0.5.7, it is possible to compile Yul files. Please read the solidity documentation about Yul which contains some code examples.
You can use the language dropdown (B. in the image below) to switch the language. This dropdown list is only available for versions 0.5.7 and beyond.
The fork selection dropdown list (C. in the image below) allows you to compile code against a specific ethereum hard fork. The compiler default corresponds to the default hard fork used by a specific version.
Please go to “Compilation Details” (G. in the image below) in the settings of the Metadata section to see the harfork name used for the current compilation.
If the contract has a lot of dependencies, it can take a while to compile. So you can use auto compilation at your discretion for instantaneous compilation.
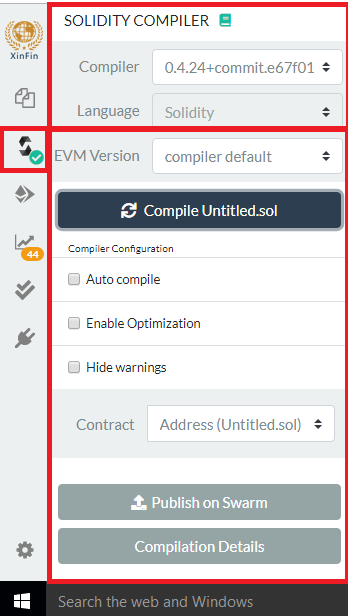
After each compilation, a list is updated with all newly compiled contracts. A compiled contract can then be selected with the Contract pulldown menu (F. in the image below).
Multiple contracts are compiled when one contract imports other contracts. You can select any of these contracts to check the information regarding that.
On clicking the “Compilation Details” button (G. in the image below), a modal opens displaying detailed information about the currently selected contract.
You can also publish your non-abstract contract to Swarm from the same tab.
Published data notably contains the ABI and the solidity source code.
After a contract is published, you can find its metadata information using the bzz URL located in the details modal dialogue SWARM LOCATION.
After each compilation, the static analysis tab builds a report, which is very valuable when addressing reported issues even if the compiler doesn’t complain. Any compilation error or warning is displayed below the contract section. See more.
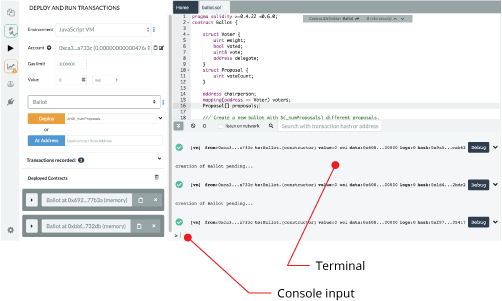
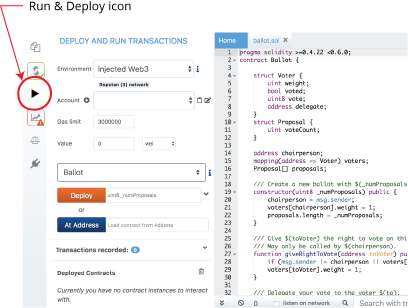
Deploy & Run
You can send transactions to the current environment using the Deploy & Run module.
To go to Deploy & Run module, click the ‘Run’ icon in the Icon panel.
In order to use this module, you need to have a contract compiled. So, if there is a contract name in the contract select box (in the image below it’s the pulldown that says Ballot), you can interact with this contract otherwise you need to select a new contract. To do that, you need to click the file in the editor panel to make it the active tab (in the image below, on the right side of the page in the main panel, the ballot.sol is the active contract). Once it’s active, go to the compiler module and compile it. You can then use the Deploy & Run module.
Run Setup
The following settings allow you to directly influence the transaction execution:
Environment:
-
JavaScript VM: All the transactions will be executed in a sandbox blockchain in the browser. This means nothing will persist after you reload the page. The JsVM is its own blockchain and on every reload it initiates a new blockchain without saving the old one.
-
Injected Provider: Remix will connect to an injected web3 provider. Metamask is an example of a provider that injects web3.
-
Web3 Provider: Remix will connect to a remote node. You will need to provide the URL to the selected provider: Geth, Parity or any other Ethereum client.
Account:
- Account: It represents the list of accounts associated with the current environment and their associated balances. On the JsVM, you have a choice of 5 accounts. If you use Injected Web3 with MetaMask, you need to change the account in MetaMask.
Gas Limit:
- This sets the maximum amount of gas that will be allowed for all the transactions created in Remix.
Value:
- This sets the amount of ETH, WEI, GWEI, etc. that are sent to a contract or a payable function. The value is always reset to 0 after each transaction execution. (Note: payable functions have a red button).
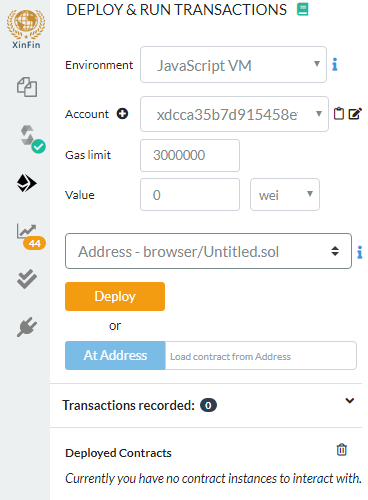
Initiate Instance
-
In the above image, the select box is set to Ballot. This select box will contain the list of compiled contracts.
-
Deploy sends a transaction that deploys the selected contract. When the transaction is mined, the newly created instance gets added (this might take several seconds). Note: if the constructor has parameters, you need to specify them.
-
At Address is used to access a contract that has already been deployed. It assumes that the given address is an instance of the selected contract. Note: There’s no check at this point, so be cautious when using this feature, and be sure you trust the contract at that address.
Pending Instances
Validating a transaction might take several seconds. During this time, the GUI shows it in pending mode. When the transaction is mined, the number of pending transactions is updated and the transaction is added to the log (see terminal).
Using the ABI
Using Deploy or At Address is a classic use case of Remix. However, it is possible to interact with a contract by using its ABI. The ABI is a JSON array that describes its interface.
To interact with a contract using the ABI, create a new file in Remix with extension *.abi and copy the ABI content to it. Then, in the input next to At Address, put the Address of the contract you want to interact with. Click on At Address, and a new “connection” with the contract will popup below.
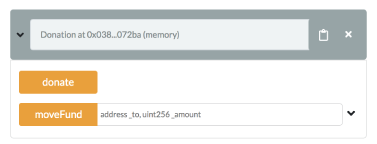
Using the Recorder
A Recorder is a tool used to save a bunch of transactions in a JSON file and rerun them later in either the same environment or in another.
Saving to the JSON file (called senario.json by default) allows one to easily check the transaction list, tweak input parameters, change linked library, etc.
There are many use cases for the Recorder such as
-
After coding and testing contracts in a constrained environment (like the JavaScript VM), you can change the environment and redeploy it to a more realistic environment like a test net with an injected web3 or to a Geth node. The generated senario.json file has the same settings that are used in the Javascript VM. This means that you won’t need to click the interface multiple times to get the state that you achieved originally, making the Recorder a tool that saves you from a lot of hassle.
-
You can also change the settings in the senario.json file to customize the playback.
-
Deploying a contract often requires more than creating one transaction and so the recorder will automate this deployment.
-
Working in a dev environment requires to set up the state in the first place.
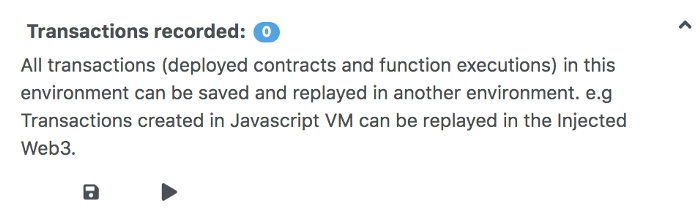
senario.json
To create this file in the recorder, you first need to run some transactions. In the above image, it has a 0 next to Transactions Recorded. This signifies that it isn’t the right moment to save transactions because there aren’t any. The number increase with every transaction you make. Then when you are ready, click the floppy disk icon to create the senario.json file.
The JSON file below is an example of the senario.json file.
In it, 3 transactions are executed:
The first corresponds to the deployment of the lib testLib.
The second corresponds to the deployment of the contract test with the first parameter of the constructor set to 11. That contract depends on the library. The linkage is done using the property link references. In that case, we use the address of the previously created library: created{1512830014773}. The number is the ID (timestamp) of the transaction that led to the creation of the library.
The third record corresponds to the call to the function set of the contract test (the property is set to created{1512830015080}). Input parameters are 1 and 0xca35b7d915458ef540ade6068dfe2f44e8fa733c
All these transactions are created using the value of the accounts account{0}.
{ "accounts": { "account{0}": "xdcca35b7d915458ef540ade6068dfe2f44e8fa733c" }, "linkReferences": { "testLib": "created{1512830014773}" }, "transactions": [ { "timestamp": 1512830014773, "record": { "value": "0", "parameters": [], "abi": "0xbc36789e7a1e281436464229828f817d6612f7b477d66591ff96a9e064bcc98a", "contractName": "testLib", "bytecode": "60606040523415600e57600080fd5b60968061001c6000396000f300606060405260043610603f576000357c0100000000000000000000000000000000000000000000000000000000900463ffffffff1680636d4ce63c146044575b600080fd5b604a6060565b6040518082815260200191505060405180910390f35b6000610d809050905600a165627a7a7230582022d123b15248b8176151f8d45c2dc132063bcc9bb8d5cd652aea7efae362c8050029", "linkReferences": {}, "type": "constructor", "from": "account{0}" } }, { "timestamp": 1512830015080, "record": { "value": "100", "parameters": [ 11 ], "abi": "0xc41589e7559804ea4a2080dad19d876a024ccb05117835447d72ce08c1d020ec", "contractName": "test", "bytecode": "60606040526040516020806102b183398101604052808051906020019091905050806000819055505061027a806100376000396000f300606060405260043610610062576000357c0100000000000000000000000000000000000000000000000000000000900463ffffffff1680632f30c6f61461006757806338cc48311461009e57806362738998146100f357806387cc10e11461011c575b600080fd5b61009c600480803590602001909190803573ffffffffffffffffffffffffffffffffffffffff16906020019091905050610145565b005b34156100a957600080fd5b6100b1610191565b604051808273ffffffffffffffffffffffffffffffffffffffff1673ffffffffffffffffffffffffffffffffffffffff16815260200191505060405180910390f35b34156100fe57600080fd5b6101066101bb565b6040518082815260200191505060405180910390f35b341561012757600080fd5b61012f6101c4565b6040518082815260200191505060405180910390f35b8160008190555080600160006101000a81548173ffffffffffffffffffffffffffffffffffffffff021916908373ffffffffffffffffffffffffffffffffffffffff1602179055505050565b6000600160009054906101000a900473ffffffffffffffffffffffffffffffffffffffff16905090565b60008054905090565b600073__browser/ballot.sol:testLib______636d4ce63c6000604051602001526040518163ffffffff167c010000000000000000000000000000000000000000000000000000000002815260040160206040518083038186803b151561022e57600080fd5b6102c65a03f4151561023f57600080fd5b505050604051805190509050905600a165627a7a72305820e0b2510bb2890a0334bfe5613d96db3e72442e63b514cdeaee8fc2c6bbd19d3a0029", "linkReferences": { "browser/ballot.sol": { "testLib": [ { "length": 20, "start": 511 } ] } }, "name": "", "type": "constructor", "from": "account{0}" } }, { "timestamp": 1512830034180, "record": { "value": "1000000000000000000", "parameters": [ 1, "xdcca35b7d915458ef540ade6068dfe2f44e8fa733c" ], "to": "created{1512830015080}", "abi": "0xc41589e7559804ea4a2080dad19d876a024ccb05117835447d72ce08c1d020ec", "name": "set", "type": "function", "from": "account{0}" } } ], "abis": { "0xbc36789e7a1e281436464229828f817d6612f7b477d66591ff96a9e064bcc98a": [ { "constant": true, "inputs": [], "name": "get", "outputs": [ { "name": "", "type": "uint256" } ], "payable": false, "stateMutability": "view", "type": "function" } ], "0xcc41589e7559804ea4a2080dad19d876a024ccb05117835447d72ce08c1d020ec": [ { "constant": true, "inputs": [], "name": "getInt", "outputs": [ { "name": "", "type": "uint256" } ], "payable": false, "stateMutability": "view", "type": "function" }, { "constant": true, "inputs": [], "name": "getFromLib", "outputs": [ { "name": "", "type": "uint256" } ], "payable": false, "stateMutability": "view", "type": "function" }, { "constant": true, "inputs": [], "name": "getAddress", "outputs": [ { "name": "", "type": "address" } ], "payable": false, "stateMutability": "view", "type": "function" }, { "constant": false, "inputs": [ { "name": "_t", "type": "uint256" }, { "name": "_add", "type": "address" } ], "name": "set", "outputs": [], "payable": true, "stateMutability": "payable", "type": "function" }, { "inputs": [ { "name": "_r", "type": "uint256" } ], "payable": true, "stateMutability": "payable", "type": "constructor" } ] } }
Deployed contracts
This section in the Run tab contains a list of deployed contracts to interact with through the auto-generated UI of the deployed contract also called udapp.
The deployed contract appears but is in its collapsed form.

Click the sideways caret to open it up.
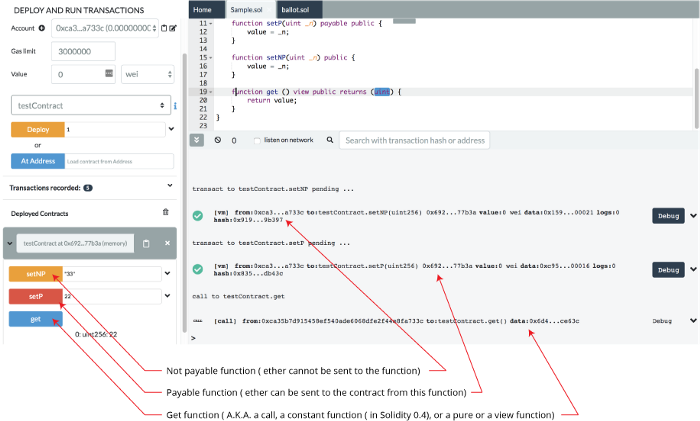
You will see the functions in the contract. The functions buttons can have different color buttons.
-
Functions that are constant or pure functions in Solidity have blue buttons. Clicking one of these does not create a new transaction. So clicking will not cause state changes but will only return a value stored in the contract without costing you a gas fee.
-
Functions that change the state of the contract AND that do not accept Ether is called non-payable functions and have an orange button. Clicking on them will create a transaction and thus will cost gas.
-
Functions that have red buttons are payable functions in Solidity. Clicking one of these will create a new transaction which can accept a value. The value is put in the Value field which is under the Gas Limit field.
For more information see more about the Solidity modifier.
If a function requires input parameters you will have to input them.
Inputting parameters
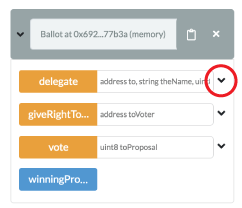
Inputting parameters in the collapsed view
(Inputting all the parameters in a single input box)
-
Parameters are separated by commas.
-
The input box tells you the type of each parameter.
-
Numbers and addresses need not be wrapped in double-quotes.
-
Strings need to be wrapped.
In the example above the “delegate” function has 3 parameters.
Inputting parameters in the expanded view
Clicking the ‘down’ caret brings you to the Multi-param Manager, where you can input the parameters one at a time. Much less confusing!
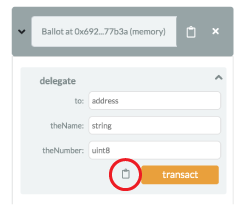
In this view, even strings need not be wrapped.
Clicking the clipboard icon will encode the inputs and will copy them. Only a valid set of inputs can be encoded.
So in case you mistakenly input a unit in place of an address, clicking the clipboard will return you an error.
Passing in a tuple or a struct to a function
To pass a tuple in, you need to put in an array [].
Similarly, to pass in a struct as a parameter of a function, it needs to be put in as an array []. Also, note that the line pragma experimental ABIEncoderV2; needs to put in at the top of the solidity file.
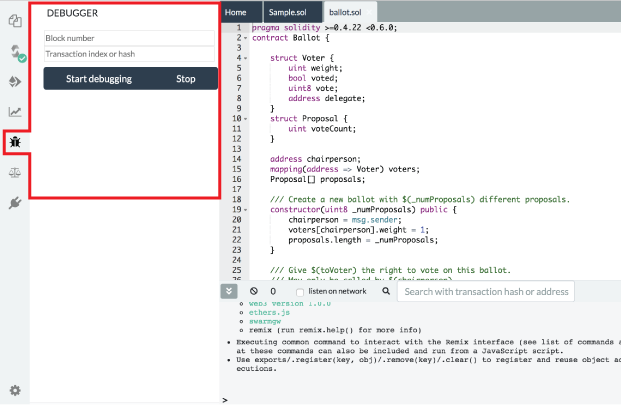
Debugger
The Debugger module allows you to debug the transaction. You can use it to deploy transactions created from Remix and already mined transactions.
Debugging works only if the current environment provides the necessary features.
To access the debugger, you can click the ‘Debug’ button in the terminal when a successful or failed transaction appears there. Alternately, you can load the module from the plugin manager and then click the bug in the icon panel. Or you can run the debug command in the console to go to the debugger.
This section gives information about the last compilation. By default, a new analysis is run at each compilation.
The analysis tab gives detailed information about the contract code. These details can help you avoid code mistakes and prompt best practices for you.
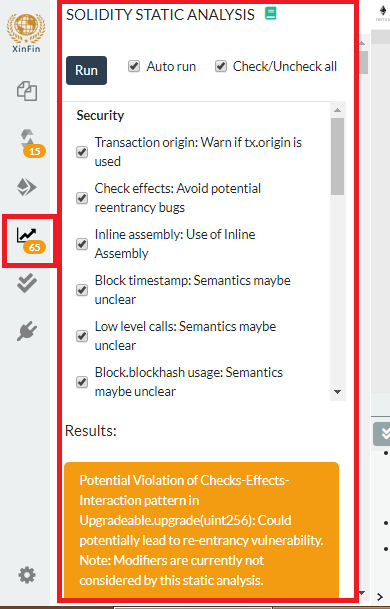
Here is the list of analyzers:
Security:
-
Transaction Origin: Warns if tx.origin is used.
-
Check Effects: Avoid potential reentrancy bugs.
-
Inline Assembly: Use of Inline Assembly.
-
Block Timestamp: Semantics may be unclear.
-
Low-level Calls: Semantics may be unclear.
-
Block.blockhash Usage: Semantics may be unclear.
Gas & Economy:
-
Gas Costs: Warns if the gas requirements of the functions are too high.
-
This On Local Calls: Invocation of local functions via this.
Miscellaneous:
- Constant Functions: Checks for potentially constant functions.
-Similar Variable Names: Checks if variable names are too similar.